
学习操作系统应该多动手
操作过程在xp下进行。
;;;;;;;;;;;;;;;;;;;;;;;;文件名boot.asm;;;;;;;;;;;;;;;;;;;;;;;;;;;;;;
[ORG 0]
jmp 07C0h:start
start:
mov ax,cs
mov ds,ax
mov es,ax
reset:
mov ax,0
mov dl,0
int 13h
jc reset
read:
mov ax,1000h
mov es,ax
mov bx,0
mov ah,2
mov al,5
mov ch,0
mov cl,2
mov dh,0
mov dl,0
int 13h
jc read
jmp 1000h:0000
times 510-($-$$) db 0
dw 0AA55h
;;;;;;;;;;;;;;;;;;;;;;;;;;;;;;以上是boot.asm内容;;;;;;;;;;;;;;;;;;;;;;;;;;
;;;;;;;;;;;;;;;;;;;;;;;;;;;;;prog.asm;;;;;;;;;;;;;;;;;;;;;;;;;;;;;;;;;;;;;;;;;;
[ORG 0]
jmp start2
msg db ‘Program Loaded Succeed!Hello, LinuxRen!’,$0
start2:
mov ax,cs
mov ds,ax
mov es,ax
mov si,msg
print:
lodsb
cmp al,0
je hang
mov ah,0Eh
mov bx,7
int 10h
jmp print
hang:
jmp hang
times 510-($-$$) db 0
dw 0AA55h
;;;;;;;;;;;;;;;;;;;;;;;;;;以上是prog.asm内容;;;;;;;;;;;;;;;;;;;;;;;;;;;;;;;
保存好这两个文件,然后在本站下载bochs和nasmw以及partcopy.
安装,然后进入到bochs的目录,建立一个bochsrc.txt文件,内容如下
megs:4
romimage:file=$BXSHARE/BIOS-bochs-latest,address=0xf0000
vgaromimage: $BXSHARE/VGABIOS-elpin-2.40
floppya:1_44=FLOPPY.IMG, status=inserted
boot:a
log:bochsout.txt
ok,快完了,再忍忍
然后使用下面的命令将上面的两个.asm文件编译
nasm boot.asm -o boot.bin
nasm prog.asm -o prog.bin
会产生两个.bin文件
然后使用partcopy创建img文件,命令如下:
partcopy boot.bin 0 200 floppy.img 0
partcopy prog.bin 0 200 floppy.img 200
会生成一个.img文件
将bochsrc.txt放到boch根目录下面,还有刚才的floopy.img文件,然后打开boch.exe按回车
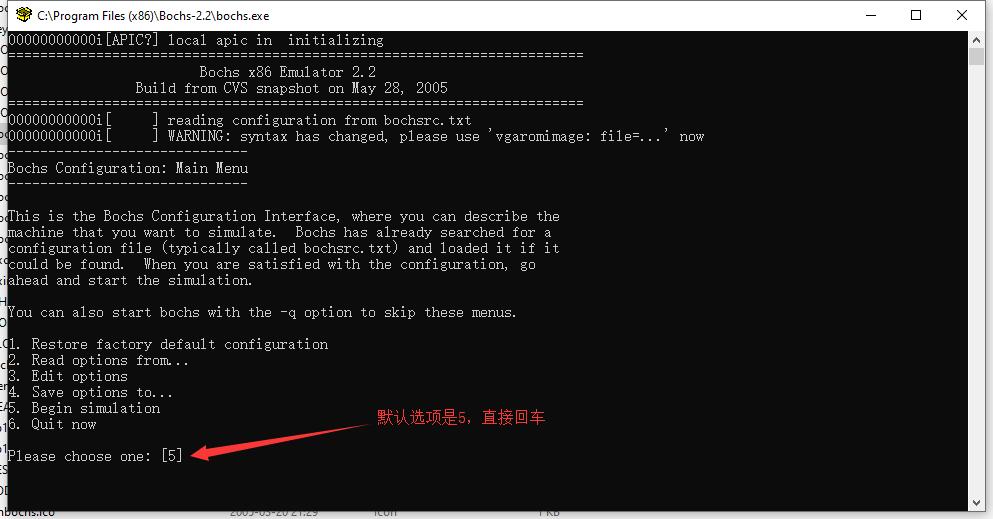
会弹出一个下面的窗口,表明启动成功

OK, Done! 本站所使用工具下载。


Start the discussion at eijil.com