每次都要重新搜索,然后设置一遍,所以这里记录下在VPS上装好操作系统后的一些设置,系统使用Ubuntu22.04,默认使用root登录。
使用Screen
因为网络环境的问题,ssh连接vps经常会掉线,所以第一件事就是要使用screen,这样掉线后不影响任务或者系统升级,避免一些灾难性问题
apt update
apt full-upgrade
apt install screen -y
编辑.bashrc,加入bash脚本,这样每次登陆时候都会自动返回上次的screen,工作更加无缝
cd
nano .bashrc
添加如下内容:
if [[ -z "$STY" ]]; then
screen -xRR default #注意screen前面有四个空格
fi
重启下,或者退出ssh,重新连接,连接时如果出现 new screen… 一闪而过,那就成功了。
开启BBR
echo net.core.default_qdisc=fq >> /etc/sysctl.conf
echo net.ipv4.tcp_congestion_control=bbr >> /etc/sysctl.conf
sysctl -p
套cloudflare后,隐藏服务器ip
套了cf后,我们就只让cf的ip可以请求vps的web服务,其它ip一概不允许。ufw默认一般都安装好了。
这个只能最大限度禁止别人刺探真实服务器ip,比如fofa或者shodan之类的。不敢保证百分百阻止,实际上,VPS运行几个月后,发现这些工具没有找到我服务器真实ip。不设置这一步的话,一般几个月后真实ip会被找到。
重置ufw规则:
ufw reset默认禁止所有进入的请求,允许所有的出去的请求:
ufw default deny incoming
ufw default allow outgoing
开放ssh连接:
ufw allow OpenSSH
ufw enable
执行只允许cf ip的脚本:
git clone https://github.com/Paul-Reed/cloudflare-ufw
cd ./cloudflare-ufw
./cloudflare-ufw.sh
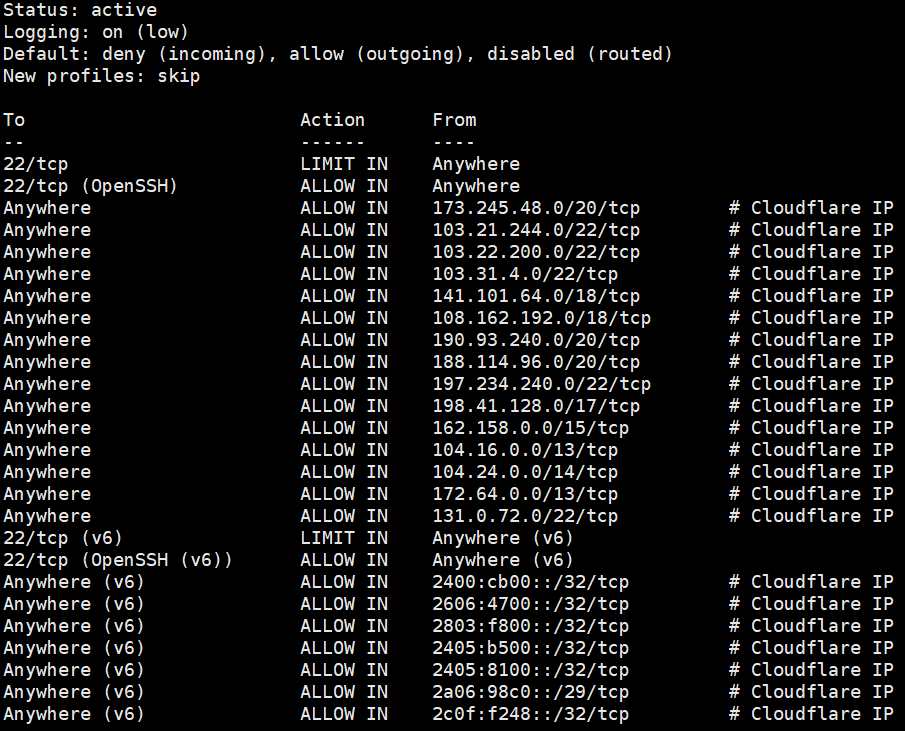
查看下当前ufw规则:
ufw status numbered把没必要的删除,只留下cf规则和ssh规则,删除可以使用命令 ufw delete 2,这里指的是第二条规则。
定期更新cf的ip:
sudo crontab -e0 0 * * 1 /root/cloudflare-ufw/cloudflare-ufw.sh > /dev/null 2>&1禁止ping服务器ip
echo net.ipv4.icmp_echo_ignore_all=1 >> /etc/sysctl.conf运行,生效
sysctl -p禁止通过ip访问web服务
nginx安装好以后,都会有一个default配置文件,在server段修改成如下:
server {
listen 80 default_server;
server_name "";
return 444;
}
注意,default_server只能出现在一个配置文件中。
使用证书登录SSH
windows下,打开powershell,注意不是cmd
ssh-keygen #一定要设置个密码,公钥,私钥可以加密压缩后放到网盘同步
cat ~/.ssh/id_rsa.pub | ssh root@VPSip "mkdir ~/.ssh; cat >> ~/.ssh/authorized_keys" #如果客户机是windows10及以上系统
ssh-copy-id root@ip #如果客户机是linux系统
配置服务器ssh,关闭密码登录:
nano /etc/ssh/sshd_config按Ctrl+w, 找到PasswordAuthentication,将前面#号删除,后面的值改为no即可。
重启ssh生效:
systemctl restart sshdNginx配置屏蔽/允许某些国家/地区IP访问
随后写
其它
注册各种网站后,第一时间先看下网站是否支持2FA,有的话一定要打开,注册时使用浏览器或者密码管理软件随机生成复杂的密码。
使用Cloudflare的email routing,打开catch all,每个需要邮箱的网站在注册时使用 网站域名@domain.ltd 邮箱。


Start the discussion at eijil.com